Mold Remediation and Restoration
Mold remediation and restoration in Lakeland, Florida. Take a look at the “before and after” pictures and learn how we treated the mold damage for our client, caused by a water supply line leak, and restored the property to its prior condition!
Need a Quote?
Same Day Callback
All Began From Water Leak Damage
At One Stop Restoration, we’re here to help property owners when mold damage strikes their property. Recently, we worked at The Nest School, in Lakeland, FL The water supply lines of The Nest School caused water damage in the mechanical room, which in turn caused mold growth on the walls around. This Lakeland property needed mold remediation and then mold damage restoration. We got in there, removed the damaged parts, cleaned everything up, restored the damages, and it now looks as good as new!
The issue
A water damage incident occurred at The Nest School as a result of leaking water supply lines, which affected the mechanical room. Prolonged exposure to moisture in this enclosed space led to mold growth on the surrounding walls, requiring immediate mold remediation services to prevent further spread and structural deterioration.
Our team responded promptly and initiated mold remediation efforts. This included establishing containment, removing sections of the mold-affected wooden walls, particularly in the mechanical room and the wall adjoining the mechanical room with the bathroom, and applying antimicrobial treatments to exposed surfaces.
Once mold remediation was complete, we transitioned to the mold damage restoration phase. We rebuilt the removed wall sections using treated materials, installed new drywall, and completed the project with professional taping, sanding, priming, and painting. The mechanical room and adjacent areas were fully restored to a safe, functional, and visually consistent condition.
The Mold Damage
The Mold Remediation and Restoration
What We Did For Mold Remediation

Initial Damage Assessment and Mold-Affected Area Marking
Our team performed a detailed inspection of the wall connecting the mechanical room and bathroom, identifying water-damaged and mold-contaminated areas. Using visual indicators and moisture meters, we marked the sections that required removal to effectively begin mold remediation, ensuring no hidden mold colonies remained behind drywall or wood framing.
Containment Setup and Mold Safety Precautions
To prevent cross-contamination during mold remediation, we established containment barriers with plastic sheeting and deployed negative air pressure systems. This safeguarded adjacent spaces such as the bathroom and mechanical room from airborne mold spores during demolition and cleanup, aligning with industry safety standards.
Selective Demolition of Mold-Contaminated Wall Sections
We carefully removed only the mold-damaged portions of the wall, including soaked drywall, deteriorated wood framing, and insulation where necessary. This targeted demolition minimized unnecessary material loss while ensuring the complete elimination of contaminated areas as part of a thorough mold remediation effort.
Treatment of Exposed Surfaces with Antimicrobial Agents
After demolition, all exposed wood framing and nearby surfaces were treated with professional-grade antimicrobial solutions. This essential step in the mold remediation process eliminated any residual spores and inhibited future mold growth, preparing the structure for safe restoration work.
What We Did For Mold Damage Restoration
Reconstruction of Wall Framework Using New Treated Lumber
In the mold damage restoration phase, we rebuilt the wall structure using new pressure-treated lumber. This ensured durability and resistance to future moisture intrusion. The framing was carefully aligned and anchored to support drywall installation and restore the structural integrity between the mechanical room and bathroom.
Installation of Moisture-Resistant Drywall and Wall Sheathing
Moisture-resistant drywall was installed over the new framing to reinforce the rebuilt wall. This product choice supports long-term mold resistance and protects against future leaks. Precise cuts and placement ensured a seamless connection with surrounding walls and existing infrastructure.
Drywall Finishing: Taping, Mudding, and Surface Preparation
All drywall joints and seams were taped and mudded with multiple coats of compound. The surfaces were sanded to a smooth, paint-ready finish, blending the repaired sections with the existing wall for a consistent look. This is a standard part of mold damage restoration.
Priming, Painting, and Aesthetic Completion
We applied a primer to seal the new drywall, followed by a color-matched coat of paint to restore visual uniformity. This final restoration step completed the rebuild process, leaving no visible signs of previous mold damage or structural repair work.
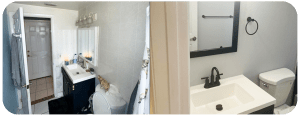
The Final Restoration of the Property
The End Result
Upon completion, we removed all containment materials, cleaned the work area thoroughly, and conducted a final walkthrough to ensure all mold remediation and restoration work met quality standards. The mechanical and bathroom areas were returned to full functionality.
Why Call One Stop Restoration of FL?
We know mold growth is a big headache, and we’re here to make it easier. From mold damage remediation to mold damage restoration, we take care of it all. If you’ve got water damage in your home in Winter Haven or in Orlando metro area, give us a call. We’ll help you get your house back in shape fast!