Ceiling Water Damage Repair Cost: What Homeowners Should Expect in 2026
February 16, 2026
- By
- One Stop Restoration Of Fl
Wondering what your ceiling water damage repair cost might look like in 2026? In this guide, we break down the exact repair steps, realistic pricing ranges, and critical warning signs every homeowner should understand before approving any work. At One Stop Restoration Of Fl, we have years of hands on experience dealing with water intrusion, and we have seen how fast a minor ceiling stain can develop into serious structural damage. What starts as a small discoloration can signal saturated drywall, weakened framing, or trapped moisture spreading behind the surface. If you are dealing with an active leak, start with our ceiling water damage repair overview to understand the immediate priorities and prevent further loss. Ignoring a soft, sagging, or stained ceiling often leads to hidden mold growth, insulation deterioration, and even electrical hazards within light fixtures or wiring. We have entered homes where a simple $600 patch repair escalated into a multi thousand dollar reconstruction because the root cause was not identified and corrected early. Acting quickly protects both your property value and your safety.
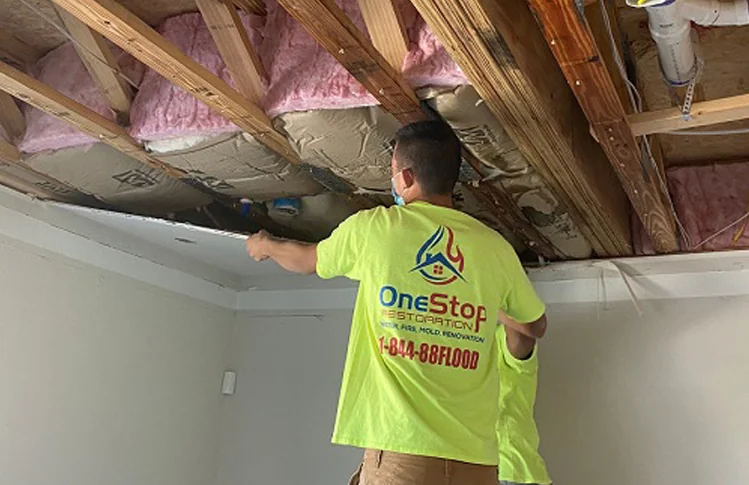
What Professional Ceiling Repair Should Always Include
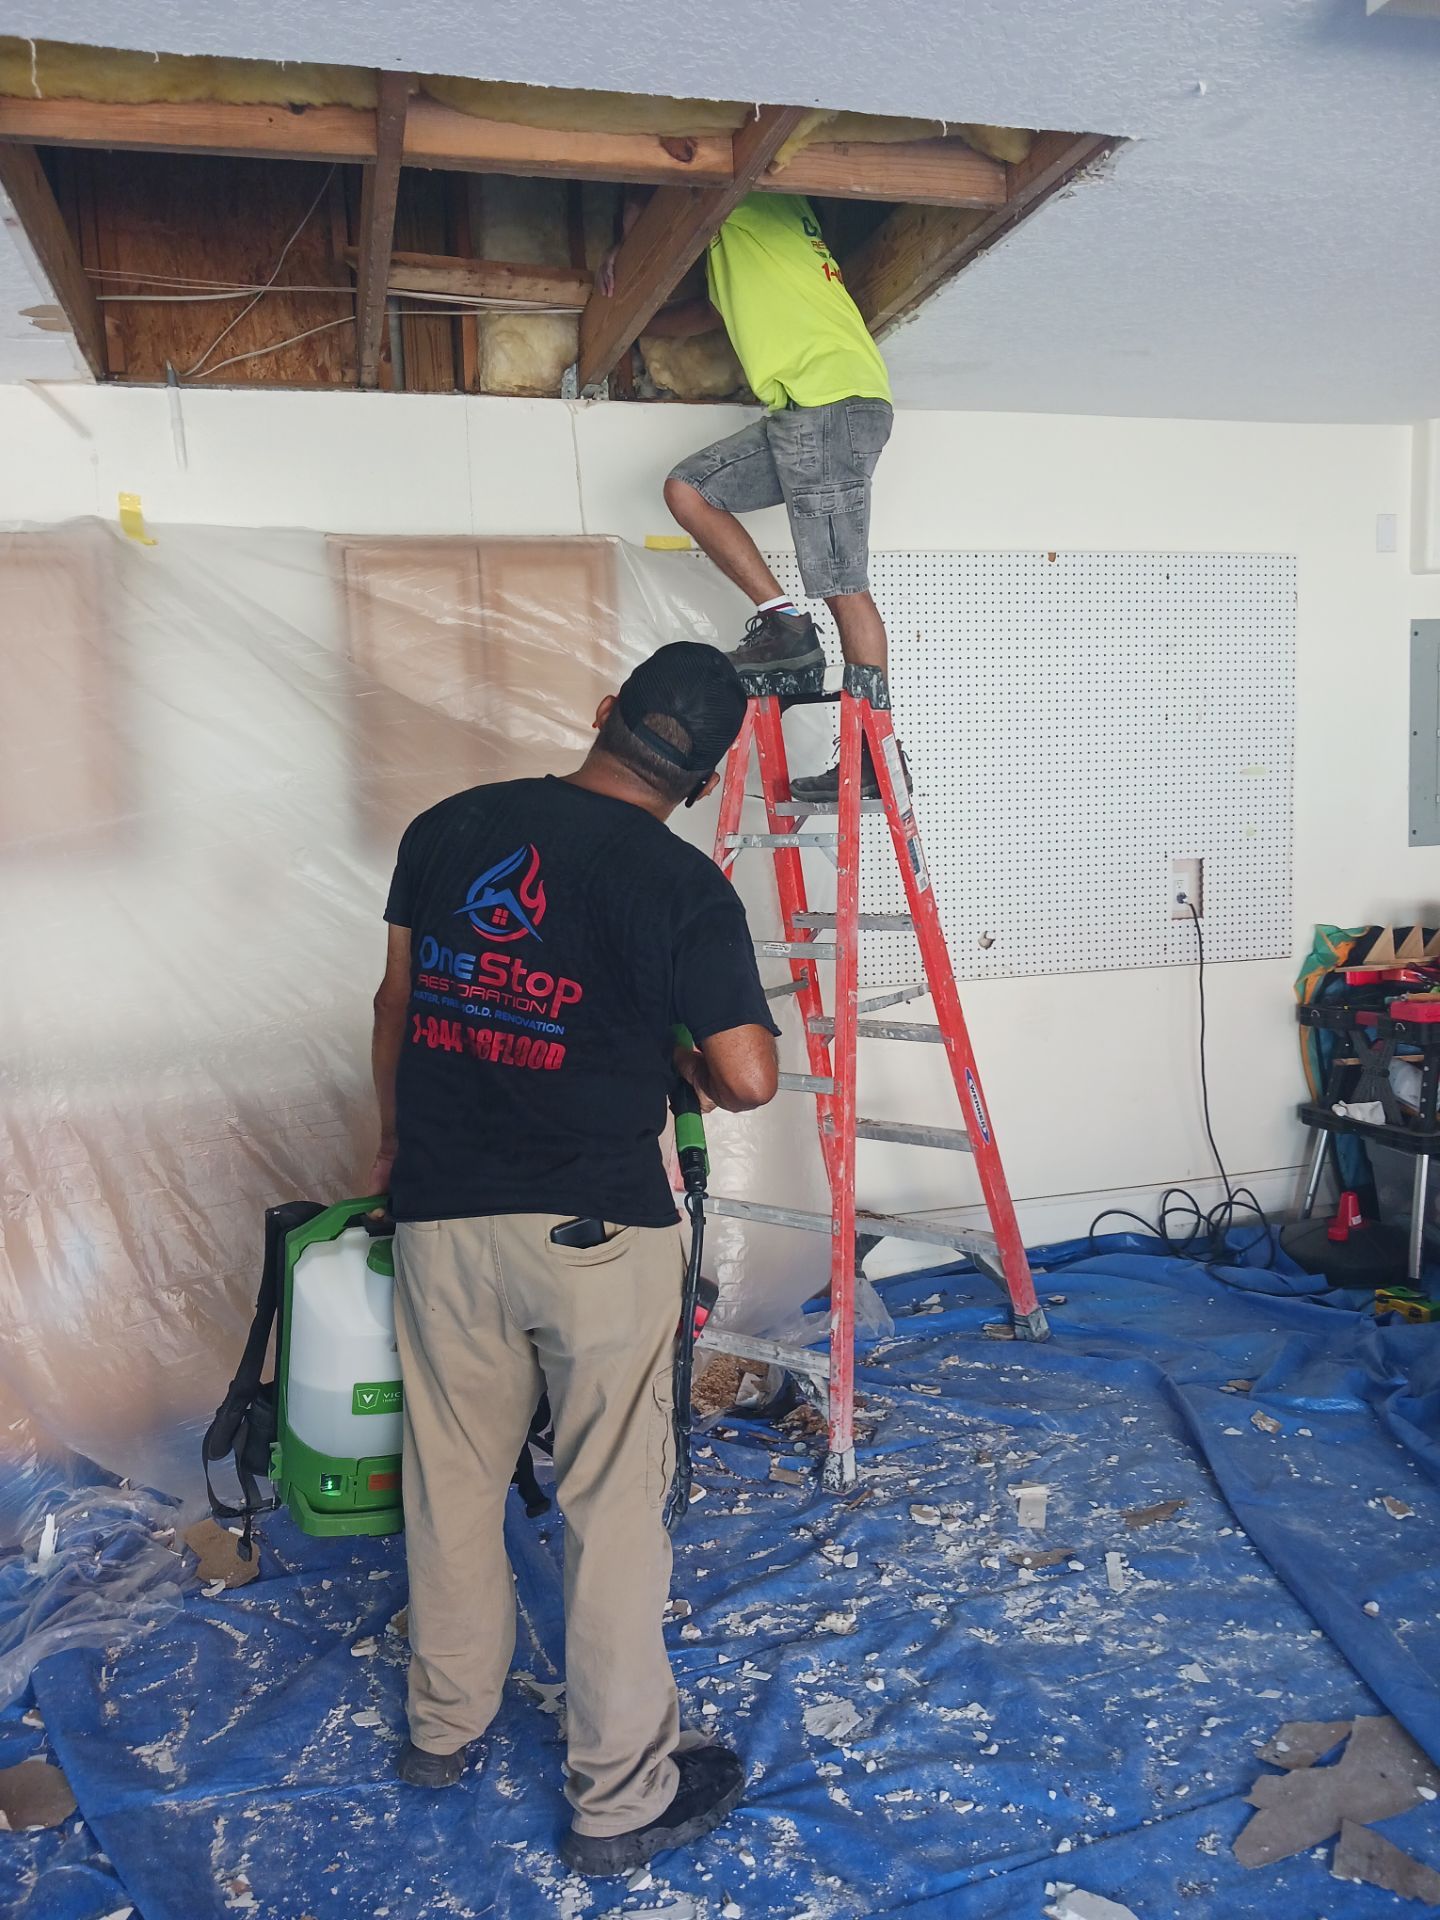
Accurate pricing starts with professional standards. The most important best practices involve proper drying, contamination control, and structural assessment. When contractors skip moisture testing or fail to remove saturated insulation, the visible repair may look fine while damage continues above the ceiling line. Excellent service typically includes:
- Documented moisture readings before and after drying.
- Removal of compromised drywall at least 12 inches beyond the visible damage when saturation is confirmed.
- Inspection of framing members for rot or fastener corrosion.
- Application of antimicrobial treatments when Category 2 or 3 water is involved, as defined by ANSI/IICRC S500.
- Stain-blocking primer such as shellac- or oil-based formulations to prevent bleed-through.
What Drives Ceiling Water Damage Repair Cost
Ceiling water damage repair cost in 2026 will depend on the extent of damage and whether structural components are involved. Minor cosmetic repairs for small stains may range from $400 to $1,200. Moderate repairs involving drywall replacement and repainting often fall between $1,200 and $3,500. Extensive damage affecting insulation, framing, or multiple rooms can range from $3,500 to $8,000 or more. Pricing may fluctuate based on:
- Site complexity (vaulted ceilings, limited attic access, electrical obstructions).
- Material costs (drywall thickness, insulation type, specialty textures).
- Total scope (mold remediation, repainting entire ceilings for color match).
Schedule a Professional Ceiling Evaluation
If you’re noticing stains, bubbling paint, or soft spots overhead, the smartest next step is a professional evaluation. We use moisture mapping tools, thermal imaging, and industry-standard drying protocols to determine the true scope before repairs begin. That protects your budget and prevents hidden mold or structural deterioration from increasing the final cost. Our team provides detailed documentation, clear timelines, and realistic pricing ranges so you can make informed decisions about your home. Whether the damage is minor or part of a larger water issue, we coordinate mitigation and reconstruction to restore the space correctly the first time. Schedule an inspection and get a clear understanding of your ceiling water damage repair cost before small problems become major expenses.
FAQs
What is included in a typical ceiling water damage repair?
A typical ceiling repair begins with identifying and correcting the source of water intrusion. Without addressing the root cause, any cosmetic repair will eventually fail. Contractors first inspect plumbing lines, roofing components, HVAC systems, or upper level fixtures to pinpoint the leak. Once the source is resolved, moisture testing is performed using moisture meters or thermal imaging cameras to determine how far the water has migrated beyond the visible stain. If drywall is saturated or structurally compromised, the damaged section is removed along with a safety margin to ensure hidden moisture is not left behind. Wet insulation is extracted and discarded, and the exposed framing is carefully examined for signs of rot, mold growth, or structural weakening. Industrial air movers and dehumidifiers are then positioned to dry the area thoroughly, often operating for several days until moisture readings reach acceptable levels. After drying is confirmed, new drywall is installed, taped, mudded, sanded smooth, and sealed with a stain blocking primer before painting. Texture matching may be required for a seamless finish. In cases involving contamination, antimicrobial treatments may be applied in accordance with ANSI or IICRC S500 guidelines.
Does homeowners insurance usually cover ceiling water damage?
Insurance coverage for ceiling water damage depends largely on the source of the water and the specific terms outlined in your homeowners policy. In many cases, sudden and accidental incidents – such as a burst pipe, water heater failure, or an overflowing appliance – are covered because they are considered unexpected events. However, damage that develops gradually over time, including slow plumbing leaks, ongoing roof deterioration, or neglected maintenance issues, is often excluded from coverage. Insurance providers typically require clear documentation showing that the source of the water intrusion was identified and corrected quickly. Supporting evidence such as moisture readings, dated photographs, inspection notes, and professional drying logs can significantly strengthen your claim. If mold growth occurs because the issue was not reported promptly, your policy may impose coverage limits or deny that portion of the claim. It is also important to note that standard homeowners policies generally exclude flood damage caused by rising groundwater unless you have purchased separate flood insurance. Before beginning major repairs, carefully review your policy and consult your insurance adjuster to confirm what expenses may qualify for reimbursement.
How long does ceiling water damage repair usually take and what does it cost?
Timelines and overall costs can vary significantly depending on the severity of the damage and the scope of work required. Minor cosmetic ceiling repairs, such as small stains, hairline cracks, or limited drywall patching, may take approximately 1-3 days to complete. More extensive projects that involve water extraction, structural drying, insulation replacement, drywall installation, texture matching, and repainting can take 5-10 days or longer. Additional time may be necessary if texture curing, primer application, and multiple coats of paint are required to achieve a consistent finish. Costs can range from around $400 for small patch-and-paint repairs to $8,000 or more for substantial structural restoration. Pricing is typically influenced by several factors, including site complexity such as ceiling height, attic accessibility, and the presence of lighting fixtures or ceiling fans. Material expenses, including specialized drywall, insulation, or custom finishes, also affect the total. The overall scope, such as mold remediation or repainting entire ceiling areas, further impacts pricing. Equipment rental for drying and dehumidification, along with labor duration, can add several hundred to several thousand dollars. Electrical or HVAC system repairs may increase the final investment. These figures are general estimates for informational purposes only. A detailed on-site assessment is necessary to provide an accurate and binding proposal.
Can I repair ceiling water damage myself?
Small cosmetic stains that show no signs of an active leak and no softness in the drywall can sometimes be handled by a skilled homeowner. In these limited cases, repairs typically include scraping away loose or peeling material, allowing the area to fully dry, applying a high quality stain blocking primer, and then repainting to restore a uniform appearance. Careful surface preparation is essential to prevent the stain from bleeding through the new paint. However, do it yourself repairs become far more risky if the ceiling feels soft to the touch, appears swollen, or begins to sag. These symptoms often indicate trapped moisture or structural weakening. Visible spotting or musty odors may also point to mold growth. Without professional moisture meters or infrared inspection tools, it is difficult to verify that the space above the ceiling is completely dry. Simply painting over damp drywall can seal in moisture and promote microbial growth. Additionally, cutting into a ceiling without proper knowledge can damage hidden wiring, plumbing lines, or insulation. If the leak source is unknown or the damaged area extends beyond a few square feet, a professional assessment is the safest and most reliable choice.
What warning signs suggest the damage is worse than it looks?
Ceiling stains are often the first visible warning sign of a problem, but significant damage can develop above the drywall long before it becomes obvious. Homeowners should look for bubbling or peeling paint, sagging areas, cracked seams, or a persistent musty odor. These symptoms frequently indicate trapped moisture that has not fully dried. If the ceiling feels soft or spongy when gently pressed, or if insulation or debris falls through recessed lighting or vents, water saturation may be widespread. Discoloration that grows darker or expands after heavy rain, plumbing use, or air conditioning operation suggests an active leak rather than an old stain. Rust forming around screws, fasteners, or nail pops can point to long term moisture exposure inside the ceiling cavity. In some cases, sections may bow slightly as wet insulation becomes heavy and strains the drywall. Prompt action is essential. Early inspection, moisture testing, and leak detection help prevent structural wood framing from weakening and reduce the likelihood of mold spreading to surrounding rooms.
What are the most common causes of ceiling water damage?
Roof leaks are among the most common causes of ceiling water damage, especially around flashing, roof penetrations, vents, skylights, or deteriorated shingles. Even a small breach in roofing materials can allow moisture to seep into the attic and eventually stain interior ceilings. Plumbing failures in bathrooms or kitchens located above the affected area frequently result in localized ceiling damage. Slow pipe leaks, loose fittings, or failed seals around tubs and showers can release water over time, leading to gradual saturation and drywall deterioration. HVAC condensation line clogs are another frequent culprit, as blocked drain lines can overflow and allow moisture to accumulate inside ceiling cavities. Appliance malfunctions, including washing machine supply line failures or leaking water heaters, may send water through multiple floors before visible signs appear below. Poor attic ventilation can also contribute to condensation buildup that drips onto ceiling surfaces. Homeowners often focus on the visible stain rather than identifying the true source. Repairing drywall without correcting underlying issues such as flashing defects, pipe connections, or drainage problems almost guarantees the damage will return. A comprehensive inspection of both the ceiling cavity and the originating system is essential to prevent recurring issues and escalating repair costs.
What should I look for when hiring a contractor for ceiling repairs?
Look for contractors who follow recognized industry standards such as ANSI/IICRC S500 for professional water damage restoration. Hiring a company that adheres to these guidelines helps ensure that proper drying procedures and safety protocols are followed. Verify that the contractor carries appropriate state licensing, general liability insurance, and workers compensation coverage to protect you from potential liability during the project. Ask whether they use calibrated moisture meters and provide documented moisture readings before sealing or repainting the ceiling. Reliable professionals should clearly explain the expected drying timeline, the type of containment they will set up to prevent dust spread, and how they plan to match your existing ceiling texture and paint finish. Request a detailed written estimate that separates demolition, structural drying, and reconstruction phases for full transparency. Be cautious of unusually low bids that skip essential drying equipment or promise immediate repainting. Proper ceiling repairs require time for moisture levels to normalize to prevent mold growth and future damage. Clear communication, thorough documentation, and strict adherence to local building codes help ensure a durable, long lasting repair.
What should I do immediately after noticing water damage on my ceiling?
First, determine whether the leak is still active or if the water intrusion has stopped. If it is safe to do so, place a bucket or waterproof container beneath any dripping water and immediately move furniture, electronics, and personal belongings away from the affected area. While a bulging or sagging section of drywall may indicate trapped water, avoid puncturing it unless there is substantial pooling and you are prepared to control the flow, since a sudden release can spread damage further. Carefully inspect accessible areas such as the attic, crawl spaces, or nearby plumbing fixtures for visible signs of leaks, wet insulation, or condensation. Take clear photos and detailed notes to document the damage for insurance claims. If light fixtures or ceiling fans are involved, shut off power to the affected area at the breaker panel to reduce electrical risk. Arrange for a professional inspection as soon as possible, even if the stain seems minor. Acting within the first 24-48 hours greatly improves the chances of minimizing repairs and overall ceiling water damage repair cost.